The Elmer's Shack
Equipment
SDR, NanoVNA
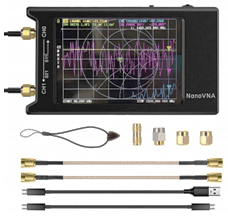
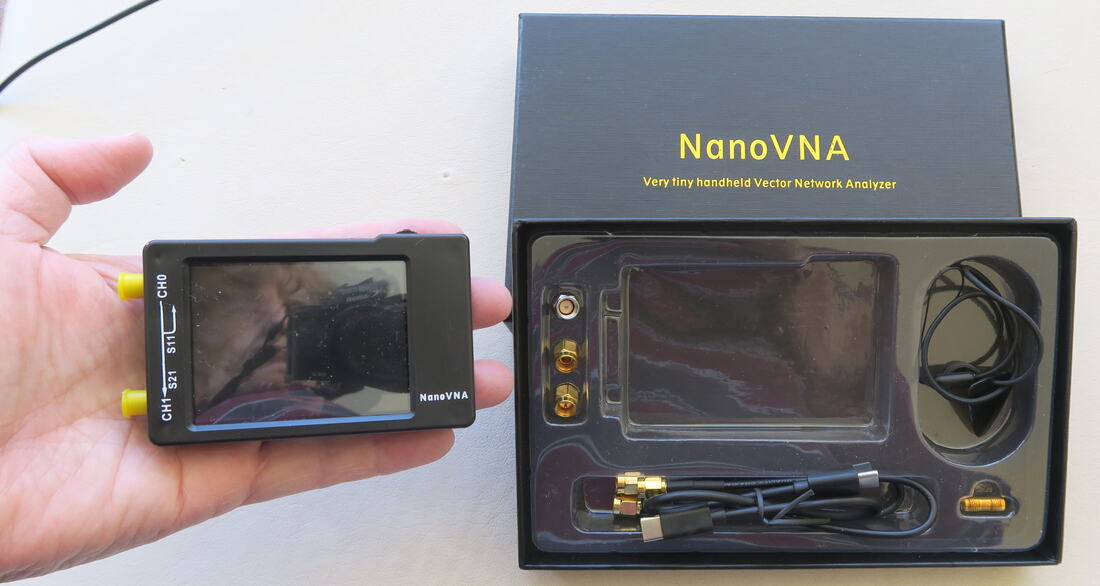
Figure 1 : NanoVNA-H4 With Accessories
|
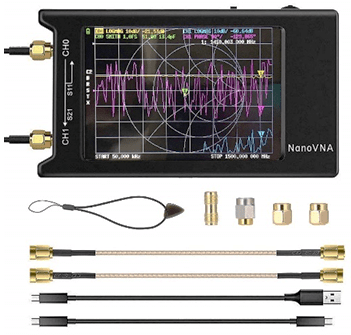
Figure 2 : NanoVNA-F V2 With Accessories
|
NanoVNA Recommendations From AD2CS
By Chris Prioli, AD2CS - [email protected] - www.ad2cs.com
I have just been asked to offer some recommendations as to the better Nano-VNA options that are available online. To that point, I can only offer my opinions, which I will gladly do, but it should be remembered that these are my preferences and are not necessarily best for everyone.
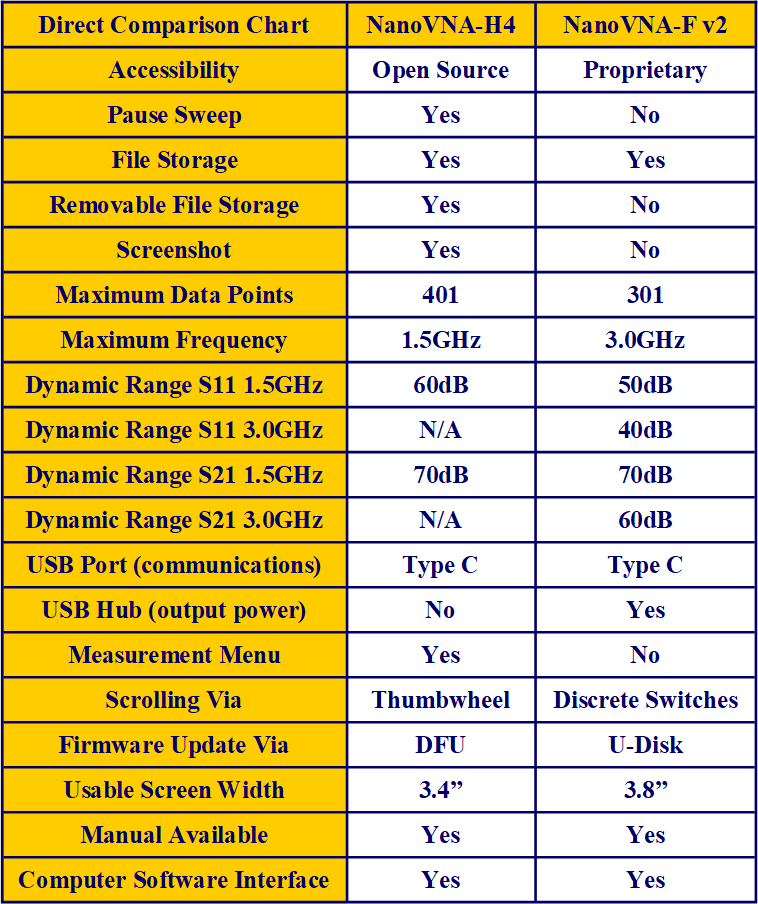
I own and routinely use two different NanoVNA models. One is the NanoVNA-H4 and the other is the NanoVNA-F v2. I will attempt to delineate these two choices and explain the pros and cons of each version. These are the two that I have settled on after using several different versions.
The NanoVNA-H4 (Figure 1) is my daily go-to device. It is rather compact, measuring a mere 5.2” x 2.9” overall, which includes the SMA connector length. The contour of the body is such that it protects the SMA connectors somewhat by projecting past the end of the connectors at the top and bottom of the body. The body is a hard plastic material with a 4.3” touch-screen display.
The label on this device carries the following information :
This unit is made by ZeenKo in China, and the label includes a QR barcode to access their website. I have upgraded the installed firmware to a DisLord release labeled as version 1.2.14 and dated 31 August 2022 at 13:39:49. This firmware provides for a maximum of 401 data points, an IF of 12kHz, an ADC rated at 348K, and an LCD screen of 488 x 3281 pixels. This is the latest version of the DisLord firmware for this device.
The NanoVNA-H4 has an ARM v7E-M core using the Cortex-M4F core variant. It is listed as being an STM32F303xC Analog and DSP platform and has a TCXO running at 26.000000MHz.
One of the most useful features of this particular version is the fact that it has a Micro-SD card slot, which allows capture of the screen image to a .BMP file. The current firmware version provides four different save options :
The S1P and S2P are two different data collection and representation formats that are standardized in the electronic measurement field. The screenshot, possibly the more useful option for most of us, does a capture of the displayed data from the screen exactly as displayed.
The S1P format, sourced from a one-port network, contains three columns of data, frequency, and two columns representing vector S11. The S2P format, on the other hand, is sourced from a two-port network and contains nine columns of data. First is frequency, then S11, S21 S12 and S22 in some type of vector format with two columns for each parameter.
The screenshot is stored as a standard Windows® bitmapped file. In every case, the option is available to either have a name automatically generated for the saved files, or the user can input a filename. The automatic naming option is selected by clicking on the AUTO NAME menu item, which places a mark in that item’s check box.
Management of the stored files is done externally, by removing the MicroSD card and inserting it into a card reader connected to a computer. Files can be moved, renamed, or deleted using the normal file management tools of the computer. The firmware version installed on my NanoVNA-H4 supports setting the system date and time. These items are used by the auto-name function when saving files to the SD card. This firmware provides for many other advanced feature options, including the ability to flip the display, to remember the current state at power-down, to load a CONFIG.INI file from the SD card, and to dump the firmware to a disk file. In addition, some more obscure options can be changed, such as the IF offset and the TCXO frequency.
From a user standpoint, this firmware supports a PAUSE SWEEP feature, which is very useful for getting a clear screenshot at a given point in the ever-changing sweep. There is also a MEASURE menu that provides some new measurement capabilities over the stock firmware. The DISPLAY menu includes a useful DATA SMOOTH option.
Next up is the NanoVNA-F. Mine is a Sysjoint v2 listed as having Revision C hardware and sysjoint firmware v0.5.0 dated 24 June 2022 at 10:35:55 (Figure 2). The firmware installed is the latest available for this unit, and it supports operation from 50kHz to about 3GHz, with from 101 to 301 data points available.
The NanoVNA-F v2 is supplied in an extruded aluminum enclosure of roughly the same overall dimensions as the NanoVNA-H4, and also has a 4.3” touch screen. The SMA ports protrude from the left side of the enclosure. This aluminum enclosure provides good shielding for the device. While the NanoVNA-H4 has a MicroSD card slot for file storage, the NanoVNA-F does not. Instead, it utilizes internal flash memory for data storage. It does not, however, provide for screenshots, instead offering only storage of S1P and S2P data. However, on this device, there is a LIST menu item that permits display of the currently-stored files.
In this case, management of the stored files requires placement of the NanoVNA into its “U-Disk” mode, also referred to as its “Firmware Update” mode. Start by connecting the NanoVNA-F to the computer using a USB-C cable in the Type C port on the NanoVNA-F. Then press and hold the center of the three pushbutton switches on the right-hand edge of the NanoVNA-F, and power up the unit while this switch is held. This will cause the unit to enter a mode where the computer will see the device as a drive, on which all of the normal file management techniques can be used. The data files written by the NanoVNA-F are in a folder names FILES.
As an interesting note on this device, it is possible to create a file called callsign.txt as a flat text file of up to fifty characters in length. Do not place a carriage return or line feed at the end of the line of text when creating the file. Store that file in the root of the NanoVNA-F u-disk. The contents of the file will be displayed on-screen during start-up of the NanoVNA-F.
This unit also uses an ARM microcontroller, this time using the Cortex-M3 core variant. The actual IC used is a GD32F103. The flash memory capacity is sixteen kilobytes. While the sysjoint firmware does not offer as many different operational options for this NanoVNA as the DisLord firmware does for the NanoVNA-H4, there are some options available here that are not offered on the NanoVNA-H4. For example, a reference position option is offered. In addition, the NanoVNA-F offers a choice of language, either English or Chinese. Now… these may not be very useful options for most of us, but they do exist and should be mentioned.
The accessory packages shipped with the two models are very similar, with the NanoVNA-F v2 including some additional SMA adapters that are not shipped with the NanoVNA-H4. In addition, the NanoVNA-F ships with a clamshell-type plastic storage box with foam insert, while the NanoVNA-H4 has a cardboard storage box, albeit also with a foam insert.
It is obvious that I have not discussed the cost of these two devices. The reason for that, and it was a conscious decision not to talk price here, is because the prices of these units can be quite volatile. I have seen forty- to fifty-dollar swings in both directions over a period of time. I have actually purchased three of the NanoVNA-H4 variants, and the prices that I paid varied by almost fifty dollars from the lowest price to the highest, all from the same vendor at Amazon. I will say at this time, however, that the NanoVNA-H4 is generally less expensive than is the NanoVNA-F v2.
Instruction manuals have been written for both of these units, though neither is from the factory, but instead are user products :
In addition, there is a pretty good “Absolute Beginner Guide” located at : https://bit.ly/42KEjcm
These two devices can be purchased from Amazon, using the following URL’s :
Whichever model you choose, you will get good value for the dollar spent. Because of the differences between them, especially as to frequencies and features, I maintain one of each in my equipment inventory. The model that I selected for the Club’s Test and Repair Bench is the NanoVNA-H4. Mostly because of its feature set, and largely because of the removable file storage.
By Chris Prioli, AD2CS - [email protected] - www.ad2cs.com
I have just been asked to offer some recommendations as to the better Nano-VNA options that are available online. To that point, I can only offer my opinions, which I will gladly do, but it should be remembered that these are my preferences and are not necessarily best for everyone.
I own and routinely use two different NanoVNA models. One is the NanoVNA-H4 and the other is the NanoVNA-F v2. I will attempt to delineate these two choices and explain the pros and cons of each version. These are the two that I have settled on after using several different versions.
The NanoVNA-H4 (Figure 1) is my daily go-to device. It is rather compact, measuring a mere 5.2” x 2.9” overall, which includes the SMA connector length. The contour of the body is such that it protects the SMA connectors somewhat by projecting past the end of the connectors at the top and bottom of the body. The body is a hard plastic material with a 4.3” touch-screen display.
The label on this device carries the following information :
- Frequency…
- 50kHz to 300MHz;
- 300MHz to 900MHz;
- 0.9GHz to 1.5GHz;
- Power 5VDC, input via USB Type C port at 1A maximum; and
- Hardware version 4.3_MS.
This unit is made by ZeenKo in China, and the label includes a QR barcode to access their website. I have upgraded the installed firmware to a DisLord release labeled as version 1.2.14 and dated 31 August 2022 at 13:39:49. This firmware provides for a maximum of 401 data points, an IF of 12kHz, an ADC rated at 348K, and an LCD screen of 488 x 3281 pixels. This is the latest version of the DisLord firmware for this device.
The NanoVNA-H4 has an ARM v7E-M core using the Cortex-M4F core variant. It is listed as being an STM32F303xC Analog and DSP platform and has a TCXO running at 26.000000MHz.
One of the most useful features of this particular version is the fact that it has a Micro-SD card slot, which allows capture of the screen image to a .BMP file. The current firmware version provides four different save options :
- save S1P;
- save S2P;
- screenshot; and
- save calibration.
The S1P and S2P are two different data collection and representation formats that are standardized in the electronic measurement field. The screenshot, possibly the more useful option for most of us, does a capture of the displayed data from the screen exactly as displayed.
The S1P format, sourced from a one-port network, contains three columns of data, frequency, and two columns representing vector S11. The S2P format, on the other hand, is sourced from a two-port network and contains nine columns of data. First is frequency, then S11, S21 S12 and S22 in some type of vector format with two columns for each parameter.
The screenshot is stored as a standard Windows® bitmapped file. In every case, the option is available to either have a name automatically generated for the saved files, or the user can input a filename. The automatic naming option is selected by clicking on the AUTO NAME menu item, which places a mark in that item’s check box.
Management of the stored files is done externally, by removing the MicroSD card and inserting it into a card reader connected to a computer. Files can be moved, renamed, or deleted using the normal file management tools of the computer. The firmware version installed on my NanoVNA-H4 supports setting the system date and time. These items are used by the auto-name function when saving files to the SD card. This firmware provides for many other advanced feature options, including the ability to flip the display, to remember the current state at power-down, to load a CONFIG.INI file from the SD card, and to dump the firmware to a disk file. In addition, some more obscure options can be changed, such as the IF offset and the TCXO frequency.
From a user standpoint, this firmware supports a PAUSE SWEEP feature, which is very useful for getting a clear screenshot at a given point in the ever-changing sweep. There is also a MEASURE menu that provides some new measurement capabilities over the stock firmware. The DISPLAY menu includes a useful DATA SMOOTH option.
Next up is the NanoVNA-F. Mine is a Sysjoint v2 listed as having Revision C hardware and sysjoint firmware v0.5.0 dated 24 June 2022 at 10:35:55 (Figure 2). The firmware installed is the latest available for this unit, and it supports operation from 50kHz to about 3GHz, with from 101 to 301 data points available.
The NanoVNA-F v2 is supplied in an extruded aluminum enclosure of roughly the same overall dimensions as the NanoVNA-H4, and also has a 4.3” touch screen. The SMA ports protrude from the left side of the enclosure. This aluminum enclosure provides good shielding for the device. While the NanoVNA-H4 has a MicroSD card slot for file storage, the NanoVNA-F does not. Instead, it utilizes internal flash memory for data storage. It does not, however, provide for screenshots, instead offering only storage of S1P and S2P data. However, on this device, there is a LIST menu item that permits display of the currently-stored files.
In this case, management of the stored files requires placement of the NanoVNA into its “U-Disk” mode, also referred to as its “Firmware Update” mode. Start by connecting the NanoVNA-F to the computer using a USB-C cable in the Type C port on the NanoVNA-F. Then press and hold the center of the three pushbutton switches on the right-hand edge of the NanoVNA-F, and power up the unit while this switch is held. This will cause the unit to enter a mode where the computer will see the device as a drive, on which all of the normal file management techniques can be used. The data files written by the NanoVNA-F are in a folder names FILES.
As an interesting note on this device, it is possible to create a file called callsign.txt as a flat text file of up to fifty characters in length. Do not place a carriage return or line feed at the end of the line of text when creating the file. Store that file in the root of the NanoVNA-F u-disk. The contents of the file will be displayed on-screen during start-up of the NanoVNA-F.
This unit also uses an ARM microcontroller, this time using the Cortex-M3 core variant. The actual IC used is a GD32F103. The flash memory capacity is sixteen kilobytes. While the sysjoint firmware does not offer as many different operational options for this NanoVNA as the DisLord firmware does for the NanoVNA-H4, there are some options available here that are not offered on the NanoVNA-H4. For example, a reference position option is offered. In addition, the NanoVNA-F offers a choice of language, either English or Chinese. Now… these may not be very useful options for most of us, but they do exist and should be mentioned.
The accessory packages shipped with the two models are very similar, with the NanoVNA-F v2 including some additional SMA adapters that are not shipped with the NanoVNA-H4. In addition, the NanoVNA-F ships with a clamshell-type plastic storage box with foam insert, while the NanoVNA-H4 has a cardboard storage box, albeit also with a foam insert.
It is obvious that I have not discussed the cost of these two devices. The reason for that, and it was a conscious decision not to talk price here, is because the prices of these units can be quite volatile. I have seen forty- to fifty-dollar swings in both directions over a period of time. I have actually purchased three of the NanoVNA-H4 variants, and the prices that I paid varied by almost fifty dollars from the lowest price to the highest, all from the same vendor at Amazon. I will say at this time, however, that the NanoVNA-H4 is generally less expensive than is the NanoVNA-F v2.
Instruction manuals have been written for both of these units, though neither is from the factory, but instead are user products :
- NanoVNA-H4 user manual can be found at : https://bit.ly/3UI2HcA
- NanoVNA-F v2 user manual can be found at : https://bit.ly/3OOY2BM
In addition, there is a pretty good “Absolute Beginner Guide” located at : https://bit.ly/42KEjcm
These two devices can be purchased from Amazon, using the following URL’s :
- NanoVNA-H4 : https://bit.ly/3SM94cb
- NanoVNA-F v2 : https://bit.ly/3wo2261
Whichever model you choose, you will get good value for the dollar spent. Because of the differences between them, especially as to frequencies and features, I maintain one of each in my equipment inventory. The model that I selected for the Club’s Test and Repair Bench is the NanoVNA-H4. Mostly because of its feature set, and largely because of the removable file storage.
Amateur Extra - Software Defined Radio Fundamentals
By Jim Wright, N2GXJ
The current Amateur Extra exam pool is good through June of 2020. What will be in the new question pool that will go into effect then? We’ll know a little later this year. Until then, one thing for sure is that the current question pool already recognizes that software defined radio technology (“SDR” for short), which is greatly improving the technical capabilities of the amateur radio equipment we use today, is something that we should become familiar with and know something about.
If you haven’t recently, and perhaps might want to before the question pool updates later this year, check out section E7F of the question pool, which includes software defined radio fundamentals.
Question E7F01 in the current pool asks the question, “What is meant my direct digital conversion as applied to software defined radio?” Did you know the answer? It is “C”, Incoming RF is digitized by an Analog to Digital converter without being mixed with a local oscillator signal.
So what’s the big deal about “SDR”, and why would I want to know anything about this, other than to pass a test?
How about the words “Simply astounding!” used by many hams after experiencing an SDR for the first time? I’ll let Claude Jollet, V32DPE, pick it up from here, and do the explaining for the interested reader in his excellent article at https://www.hamradiosecrets.com/ham-radio-receiver.html.
SDR Receiver (www.hamradiosecrets.com)
Is A NanoVNA On Your Holiday Wish-List?
By Jim Wright, N2GXJ
The Holidays are approaching! Have enough gizmos in your radio toolbox yet? Surely not! There has to be room next to your trusty digital volt-ohm meter for some RF measurement tools. How about an SWR meter? Do you have one of those? They’re really nice to check on your antenna systems. But most only cover HF. And then, there is the cost. Ones that cover higher bands, like 2 meters and 70cm, can be quite expensive, running into the upper hundreds of dollars. If all you want to do is see if the SWR on your car’s 2 meter mag mount antenna is any good, who wants to spend many hundreds of dollars just to find out? Isn’t there another option?
Yes there is! I’m talking about the NanoVNA, and its many variants. It’s a gizmo that is capable of SWR measurements, and much more. And a with prices under $100, with some as low as $60, you can feel less guilt about putting one on your holiday gift wish list!
Not heard about this gismo? Well, now you have. It is a two port device, capable of all kinds of transmission and reflection measurements, including TDR cable fault analysis, but for now we’ll just focus on using port0, and getting SWR measurements. There are several manufacturers of these little gizmos, and they come in different revisions, with different features and frequency ranges supported. I chose a NanoVNA-H, HW version 3.4, with USB-C interface for charging the internal battery and connecting to a laptop computer. It also came with set of calibration connectors (more about that later). I used https://nanorfe.com/nanovna-v2.html to research selections. There are other options.
First, a warning. This is a vector network analyzer (VNA), not an SWR meter. It is not “plug and play”. Like all VNA, it does come with a learning curve, and certain quirks. An example of such a quirk is that you need to attach and detach a series of short, open, and 50 ohm load connectors to the device as part of a calibration procedure each time you switch to a new range of frequencies to test with.
One of the advertised features is that it is very tiny and hand-held. That, it is. But that comes with compromises. For me, the back-lit display is not very bright and easily washes out in sunlight. Sure it is tiny and fits in your hand, but for me, I have trouble reading it. The font used for the display and the on-screen menu is so micro-tiny on the touch display, that I can barely read it even with reading glasses in a dark location.
I almost gave up on the device until I found a work-around, which was to use my laptop connected to the device, with a piece of software called “nanovna-saver-0.2.2” to control tests and display measurement results. That software saved the day. With it, I could now check on my home 2 meter/70 cm vertical antenna, the mag mount for my car, my portable Fox Hunt antenna, as well as work on new home-brew antenna projects, like one of those Lindenblad satellite antennas the “W2MMD SkunkWorks” crew have been producing.
To get an idea of the kind of data you can get from this gizmo, here are some examples, for a mag-mount, and for one of those Lindenblad. Think this is something you might like to put on your holiday wish list? Enjoy!

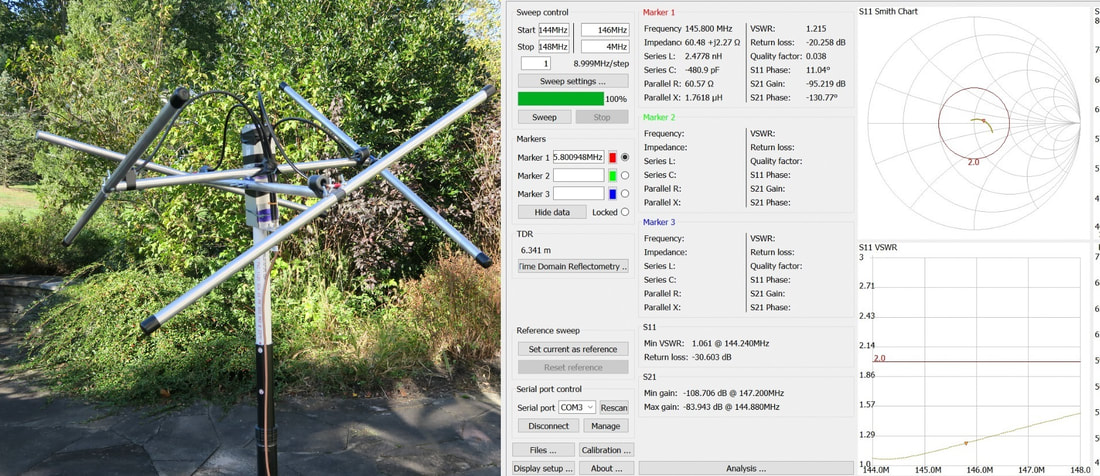
VNA’s 2 Meter Smith and SWR Plot for the Mag Mount
VNA’s 2 Meter Smith and SWR Plot for the Lindenblad