The Elmer's Shack
Software
WSJT-X, FT4, FT8, Remote Ham Radio, PSKReporter, FLDIGI, VOACAP, EchoLink, LoTW
How to create multiple user configurations in WSJT-X/FT8
Introduction
WSJT-X is an outstanding software program used for making digital Amateur Radio contacts, including contacts in the new FT8 digital mode.
Reference: www.physics.princeton.edu/pulsar/k1jt.
Here’s a quick “how to”, with examples, for configuring WSJT-X for multiple personalized configurations. This is particularly useful, for example, when you have different operators with different callsigns in the same household sharing a computer, each wanting their own customized configuration(s).
To do this, the simple steps are to clone the current configuration, switch to the cloned configuration, and then customize it. Steps to do this are detailed in this paper. To quickly switch between them, you simply use the Configurations menu to select which one you want to switch to, and the program automatically restarts into that configuration.
Details
The “configurations” menu on WSJT-X allows for you to pre-define, and switch between, multiple configurations that you can define and save ahead of time. This can be useful, for example, when there are multiple Amateur Operators that are sharing a computer, and each wants to have a pre-defined settings profile with their callsign, and other settings, that they can easily return to when the user of the program changes.
Here’s some screen shots and instructions showing how I created a new profile for a callsign W2MMD, by cloning all the default parameters that I have set up for my use.
Check Default Settings
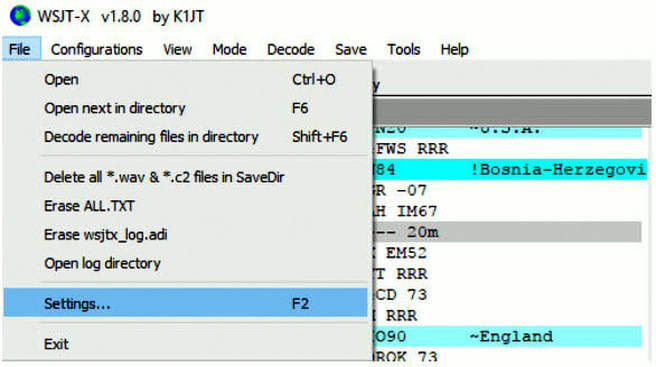
First, start the program, and check all the default settings. Settings are found on the File->Settings pop up menu, as shown here.
WSJT-X is an outstanding software program used for making digital Amateur Radio contacts, including contacts in the new FT8 digital mode.
Reference: www.physics.princeton.edu/pulsar/k1jt.
Here’s a quick “how to”, with examples, for configuring WSJT-X for multiple personalized configurations. This is particularly useful, for example, when you have different operators with different callsigns in the same household sharing a computer, each wanting their own customized configuration(s).
To do this, the simple steps are to clone the current configuration, switch to the cloned configuration, and then customize it. Steps to do this are detailed in this paper. To quickly switch between them, you simply use the Configurations menu to select which one you want to switch to, and the program automatically restarts into that configuration.
Details
The “configurations” menu on WSJT-X allows for you to pre-define, and switch between, multiple configurations that you can define and save ahead of time. This can be useful, for example, when there are multiple Amateur Operators that are sharing a computer, and each wants to have a pre-defined settings profile with their callsign, and other settings, that they can easily return to when the user of the program changes.
Here’s some screen shots and instructions showing how I created a new profile for a callsign W2MMD, by cloning all the default parameters that I have set up for my use.
Check Default Settings
First, start the program, and check all the default settings. Settings are found on the File->Settings pop up menu, as shown here.
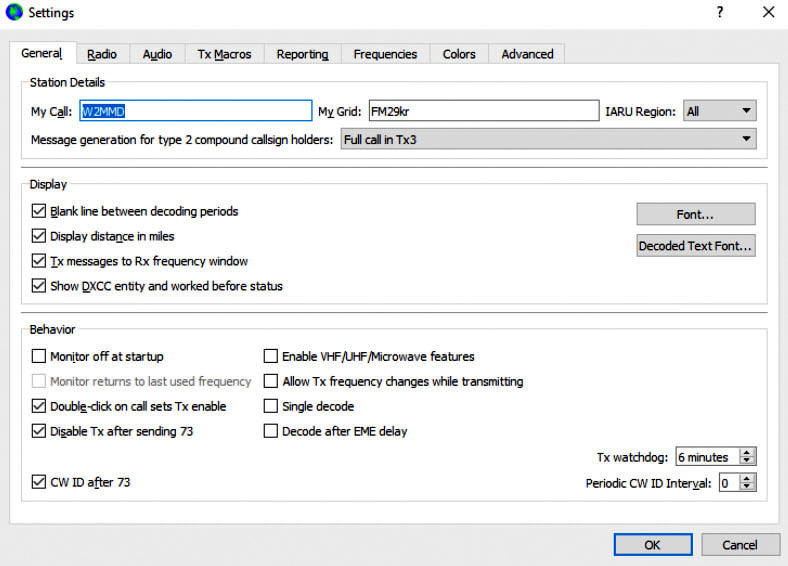
For me, from the File->Settings->General tab, the callsign and other check boxes look like this. In particular, I like these display settings as the default for all of my profiles. You customize them later for each profile you create.
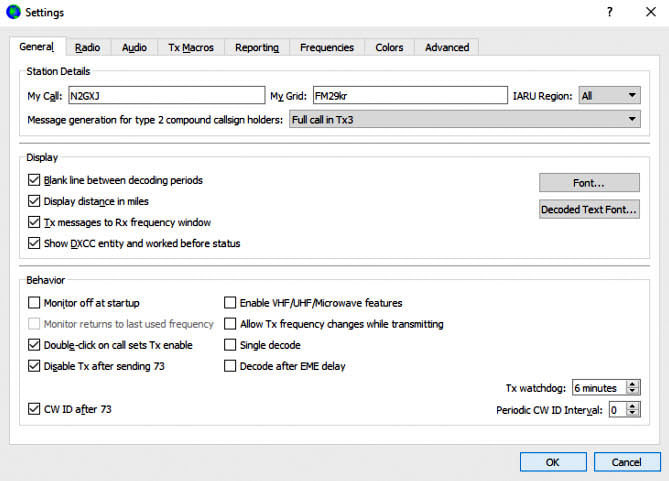
Make all the adjustments you want on the General, Radio, Audio, and other settings tabs, and then press “OK” at the bottom to save them in the default profile. You will have a chance later to customize these in the new profiles you will create from this profile.
Clone new configuration
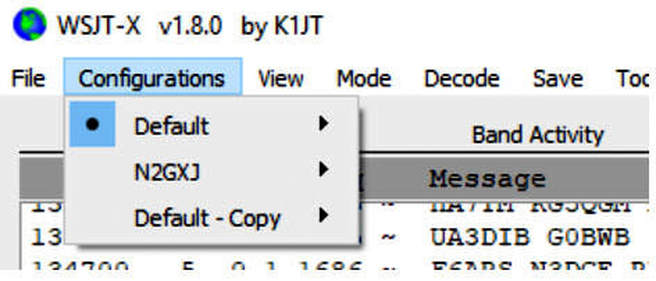
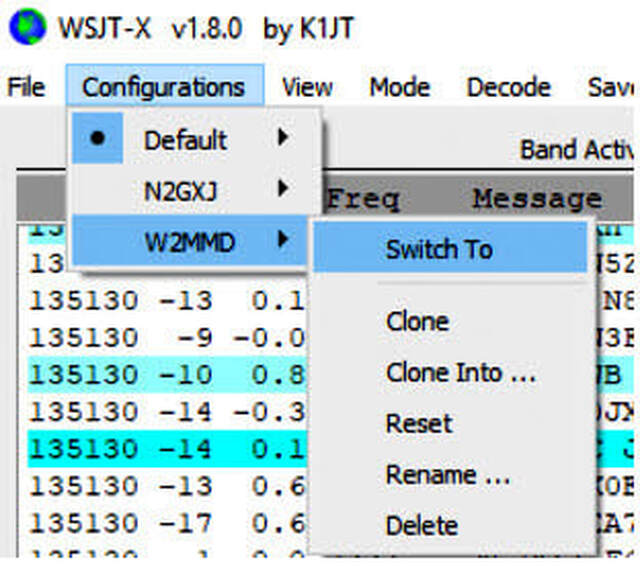
Next, check the Configurations menu. There is a “dot” next to the current configuration. From that configuration, “clone” to create a copy of the current configuration, as shown here.

After doing this, you will now end up with something like this when you go back to the Configurations menu. Note the new entry, with same name as your current entry, with the text “- Copy” added to the name.
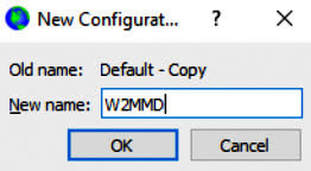
Select the new clone (copy), and rename it. I am renaming it to W2MMD in this example. Of course, you would want to change it to a name of your choice.
|

|
Switch to the new configuration
Next, from the same Configurations drop down, switch to this new configuration.
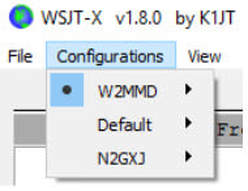
The result of switching to it should result in a quick restart of the software program. Then when you look at the Configurations after this quick restart, you should see the “dot” is now next to your switched to configuration on the Configurations choices.
While running in the newly cloned and renamed configuration, next we will customize it.
Customize current configuration
Next, we customize this cloned configuration that we have switched to. In this case, we need to go back to the File-Settings menu, and change the callsign to be W2MMD, and then save that by pressing OK after updating the callsign on the File->Settings->General tab.
That’s it!
Create other customized configurations like this, and then “switch to” whichever one you want to quickly change users, or operate with different settings you have defined and named as different Configurations.
Hope you find this helpful!
Jim, N2GXJ
Click the link below to download a PDF version of this article
How to create multiple user configurations in WSJT-X/FT8.PDF
Remote Ham Radio
By Karl Frank, W2KBF
Introduction :
For many years radio amateurs set have set up stations that can be controlled from distant locations. The motivation may be to take advantage of hilltop antenna sites or to permit hams who travel on business or on extended vacations to access their home stations. This article introduces a few concepts involved in remote operation and relates steps that I took to establish a basic remote station at my QTH in Swedesboro that I can access from anywhere.
To set up a radio station for remote control, one needs :
Selecting the Radio :
I wanted to operate CW and SSB on HF and also participate in nets on the GCARC 2 meter FM repeater. Some radios have a removable control panel and I liked the idea of being able to take the control panel with me when I travel. None of my existing radios met all of these specifications so a new rig was in order. Also, I did not want to spend a lot of money for a radio that would be left running unattended 24/7/365. For several months I vacillated between the Icom IC-7100 and Yaesu FT-857D, but reached a decision when Icom offered a factory rebate on the IC-7100.
Selecting the Antennas :
The IC-7100 has one SO-239 for HF plus 6 meters and a second SO-239 for the 144 and 440 MHz bands. I selected a 133 foot end-fed wire antenna from www.myantennas.com that presents a low SWR on 80 - 10 meters and re-used an old Cushcraft dual-band VHF/UHF vertical antenna. In this way, with two multiband antennas, I avoided the need for a tuner and an antenna switch (note: I recently added an LDG autotuner that helps on 75 and 80 meters).
By Karl Frank, W2KBF
Introduction :
For many years radio amateurs set have set up stations that can be controlled from distant locations. The motivation may be to take advantage of hilltop antenna sites or to permit hams who travel on business or on extended vacations to access their home stations. This article introduces a few concepts involved in remote operation and relates steps that I took to establish a basic remote station at my QTH in Swedesboro that I can access from anywhere.
To set up a radio station for remote control, one needs :
- A transceiver capable of Computer Assisted Tuning (CAT) : Most HF radios made by Icom, Kenwood or Yaesu over the last 20 years are capable of CAT control via a serial or USB port as are a number of current models from Elecraft and Flex. If your radio can be controlled by a local computer running applications such as N1MM or Ham Radio Deluxe it also can be controlled by remote over the Internet.
- A High-Speed Internet Connection : FIOS, cable or DSL are suitable but dialup does not have sufficient bandwidth.
- A “server” at the Radio Site and a “client” at the Control Operator Site to handle audio and command instructions between the radio and the control operator.
- Access to the router at the Radio Site in order to configure Port Forwarding (more on this later).
- A static IP address for the router at the Radio Site or use of a Dynamic DNS Service (more on this later).
Selecting the Radio :
I wanted to operate CW and SSB on HF and also participate in nets on the GCARC 2 meter FM repeater. Some radios have a removable control panel and I liked the idea of being able to take the control panel with me when I travel. None of my existing radios met all of these specifications so a new rig was in order. Also, I did not want to spend a lot of money for a radio that would be left running unattended 24/7/365. For several months I vacillated between the Icom IC-7100 and Yaesu FT-857D, but reached a decision when Icom offered a factory rebate on the IC-7100.
Selecting the Antennas :
The IC-7100 has one SO-239 for HF plus 6 meters and a second SO-239 for the 144 and 440 MHz bands. I selected a 133 foot end-fed wire antenna from www.myantennas.com that presents a low SWR on 80 - 10 meters and re-used an old Cushcraft dual-band VHF/UHF vertical antenna. In this way, with two multiband antennas, I avoided the need for a tuner and an antenna switch (note: I recently added an LDG autotuner that helps on 75 and 80 meters).
|
Selecting the Client and Server Equipment:
There were two basic approaches : I could use computers to act as the server at the Radio Site and client at the Control Operator Site, or I could purchase a hardware solution from www.RemoteRig.com. I opted for the latter because I did not want to leave a computer running at the radio site. Figure 1 shows how the control panel plugs in to the RemoteRig client, which in turn plugs in to a router. At the other end, the body of the IC-7100 plugs in to a RemoteRig server, which in turn plugs into a router. The Internet carries the traffic between the two routers. This permits me to operate the IC-7100 using the control panel as if I were sitting in front of the radio, even when I am far away. |
Figure 1 : IC-7100 control panel, RemoteRig client and router
|
How it works :
Audio is encoded and decoded by the client and server using Voice over Internet Protocol (VoIP) which will be familiar to users of EchoLink and Skype. The server at the Radio Site handles communications between the radio and a router. The client at the Control Operator Site handles communications between the control panel and the router at that site. Tuning and other radio adjustments are sent using standard Internet Protocols, i.e. SIP, UDP, and TCP. When operating CW, a buffer helps with internet latency and jitter. For security, access to the radio station is password protected.
Configuration :
Setup of the RemoteRig boxes is not exactly Plug-and-Play, but it is not very difficult either. Configuration is via a web-based interface so, for convenience, I assigned the static IP address of 192.168.1.227 to the Radio Server and 192.168.1.228 to the Control Client, as recommended by the manufacturer. The static IP addresses make it easy for me to find the client and server on my network if I need to tweak a setting. Also, I configured the TX-timeout function of the IC-7100 to cease transmitting in the event that the remote control link fails and causes the radio to be stuck in transmit mode for more than 3 minutes (to satisfy FCC regulations).
Firewalls, NAT, and DDNS :
Home routers act as a gateway between two networks : The public Internet, which is a Wide Area Network (WAN), and your private home or Local Area Network (LAN). Routers perform several functions that guard your home network against hackers. Unfortunately, these functions also will block your attempts to access your radio station from the Internet.
The first problem is that home routers usually run a firewall that allows clients within the home network to make outgoing connections requests, e.g. to a mail server or for shopping on Amazon, but will protect your home network by blocking connection requests that originate from the outside. This firewall would make it impossible for a traveler to access their radio station when attempting to connect from outside of the home network. One solution is to set up a Demilitarized Zone (DMZ) that would make a designated server inside your LAN visible to the outside, but this could expose it to hacking. A better solution is to configure your router to permit Port Forwarding, such that only packets directed to specific ports are permitted to pass from the Internet thru the router to a specific server on the local home network. My setup required Port Forwarding for SIP (Session Initiation Protocol), UDP (Audio and Control Commands), and TCP (for the Web Interface). Instructions for configuring your specific model of router can be found at www.portforward.com.
A second problem is that, when acting as a gateway to the Internet, a router performs Network Address Translation (NAT) in which the router is identified on the Internet by a public WAN address, but re-addresses or translates incoming packets to be compatible with range of IP addresses used on your private local network. For example, as I write this, my router is known to the Internet as 173.54.23.5, but my computer is known to my LAN as 192.168.1.3 (the current public WAN IP address of your router can be discovered by browsing to www.whatismyip.com). This makes it difficult for connection requests originating from the Internet to find the target server within your LAN. A further complication is that unless you pay extra for a static IP address, your Internet Service Provider (ISP) can change the public IP address of your home router at any time. This has been likened to the Post Office changing the street address of houses in your neighborhood on a daily basis. How could a letter that is addressed and mailed to you on Tuesday be delivered to your home on Wednesday if your street address was changed overnight?
The solution is to subscribe to a Dynamic Domain Name System (DDNS) service. This permits an application running on a server within your network to send periodic messages to the DDNS service reporting the current address of the router and the port to which it is connected. By using a DDNS service, the connection requests that you make when far away will be routed to the current, correct IP address of your radio station. RemoteRig provides a free DDNS service for its customers that permits my station to report its current public WAN address every 20 minutes. Other free DDNS services are available, but a paid subscription to a service such as www.dyn.com/remote-access, is reported to be the most reliable. Once I set up Port Forwarding and subscribed to a DDNS service, I could send connection requests to the appropriate port and IP address via the DDNS service and operate my radio by remote.
Discussion :
The approach that I described is just one of several ways to set up remote control over the Internet. The best method for you will depend upon the equipment at hand and how many users are anticipated. Club stations may want to use the free server application from
www.remotehams.com which can be installed on a computer that is left running at the radio station and accessed by software clients. Certain high-end radios from Icom and FLEX are Internet-ready with built-in servers. This eliminates the need for a host computer or RemoteRig hardware at the Radio Site. Depending on the setup, an Android phone with a good 4G connection plus appropriate app may be all that is needed as client for the operator at the Control Site.
In summary, good hardware and software is available that makes remote operation of an amateur radio station far less difficult or expensive than you may have thought. The hardest part is sorting through all of the possibilities.
Thanks to Randy WU2S for review and helpful comments, particularly with respect to Internet concepts.
Weak Signal HF DXing For Technophiles
By Jim Wright, N2GXJ
Quick Quiz : Which has the best chance of getting through under challenging signal to noise conditions, CW (Morse code), or FT8?
Answer : FT8. And it is not even close. See the chart below. But did you know that there are other modes, including a new mode being worked on for very low frequency experimenters that can do much better?
Gary Hinson, ZL2IFB, has maintained an excellent operating guide for FT8 that now includes an Appendix on FT4, offering an updated comparison. The data in the chart below is adopted from this appendix in his guide. If interested, you can explore links to find a conversational (typing mode) FT8 software program called JS8call, techniques on how to ensure your computer time is set accurately enough to use the FT modes, setting appropriate transmit levels, how to properly configure hound mode when chasing a DXpedition in fox mode, and more from this guide, which can be found at : www.g4ifb.com/FT8_Hinson_tips_for_HF_DXers.pdf.
I really can’t recommend a better guide to using WSJT for FT modes than this one. If you’ve not yet been using FT8, or even if you already have, if you’ve not seen this before, it’s a must read. The number of tricks and tips included are quite impressive. Enjoy!
Lowest copyable signal-to-noise ratios in 2.5 kHz bandwidth :
- SSB +10ish
- MSK144 -8
- CW -15
- FT4 -16
- FT8 -21
- JT4 -23
- JT65 -25
- JT9 -27
- QRA64 -27
- WSPR -31
- ?? -35dB*
How-To Fix Frequencies List To Use For FT4
By Jim Wright, N2GXJ
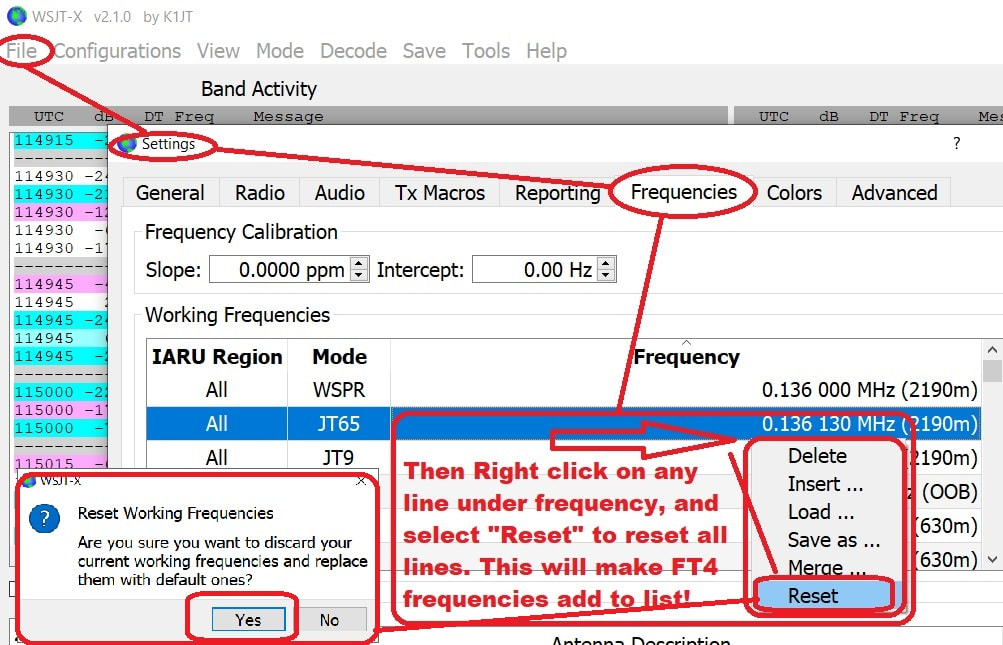
A common problem seen when upgrading WSJT-X to the latest version 2.1.0 is that, when you switch the mode from FT8 to the new FT4 mode, the displayed frequency, such as 14.074 on 20 Meters, gets highlighted in bold red. This indicates you are not on the “normal” frequency for use of the FT4 mode on this band. But the common problem is that you can’t select the drop down on the left to pick the right frequency for the FT4 mode because the suggested working frequencies for the FT4 mode don’t seem to have been added during the software install. How fix this?
It is actually quite simple. You just need to reset the working frequencies. The trick is figuring out how to do that. See the screen picture below to illustrate how this is done. Once you do this for 20 Meters, you should now see 14.080 as the suggested working frequency. That’s it! Good luck and have fun!
By Jim Wright, N2GXJ
A common problem seen when upgrading WSJT-X to the latest version 2.1.0 is that, when you switch the mode from FT8 to the new FT4 mode, the displayed frequency, such as 14.074 on 20 Meters, gets highlighted in bold red. This indicates you are not on the “normal” frequency for use of the FT4 mode on this band. But the common problem is that you can’t select the drop down on the left to pick the right frequency for the FT4 mode because the suggested working frequencies for the FT4 mode don’t seem to have been added during the software install. How fix this?
It is actually quite simple. You just need to reset the working frequencies. The trick is figuring out how to do that. See the screen picture below to illustrate how this is done. Once you do this for 20 Meters, you should now see 14.080 as the suggested working frequency. That’s it! Good luck and have fun!
Using PSKREPORTER As A Health And Welfare Hack?
By Jim Wright, N2GXJ
Perhaps as a follow-up to the recent earthquakes in California, I stumbled across this thought-provoking post on the Facebook page : www.facebook.com/groups/FT8.Digital.Mode
Tim Goeppinger : I'm not making a joke. You can use FT8 as a way to let your relatives back East that you are OK. If you CQ on an HF band, your family can find you on PSKREPORTER.
Very interesting. Even if his relatives were not hams, or even if they were and their radio was not on at the time, or if it was on, but propagation did not favor his relatives being able to respond with a confirmation (a QSL) at the time, there likely would still be a record of him having transmitted at a particular time. This is because of the vast network of WSJT-X users out there today that have their software configured to automatically report whatever signals they can decode as reception reports sent to be logged at PSKREPORTER.
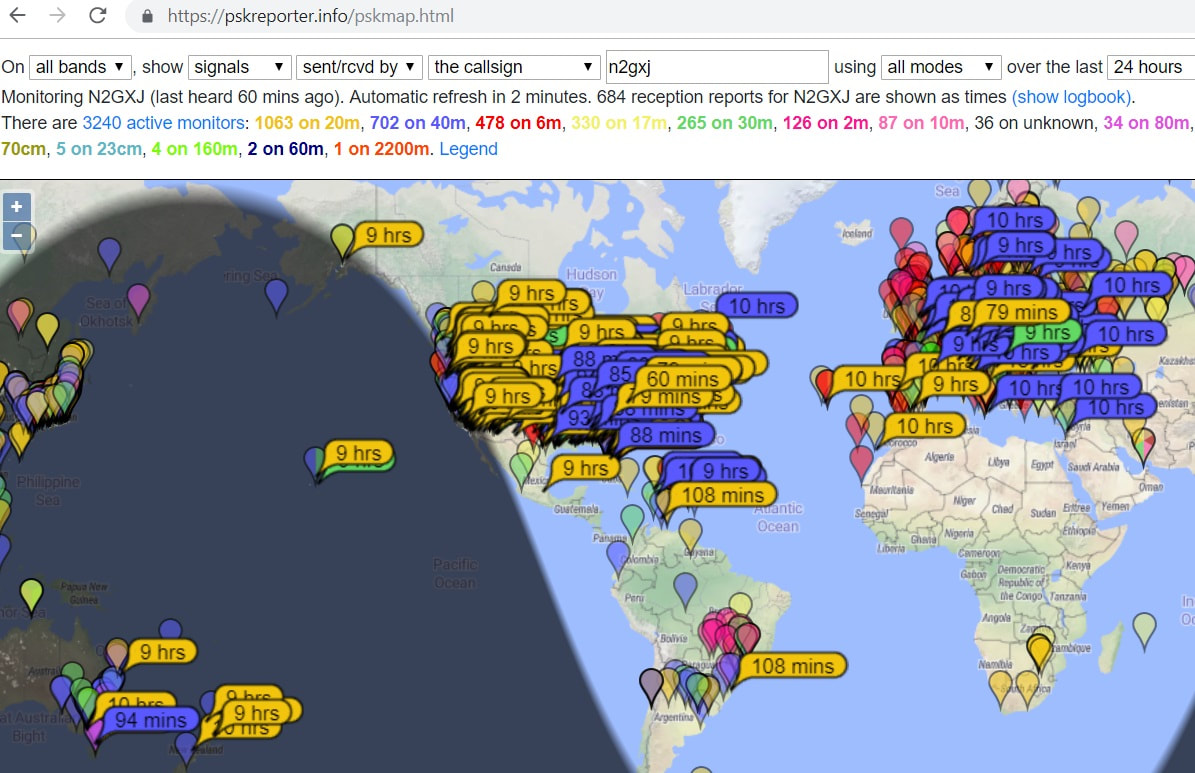
Those reception report records are easily publically visible to anyone using the map display, filtered by the caller’s callsign, for up to 24 hours at : www.pskreporter.info.
See the PSKREPORTER map display example below, using my “n2gxj” callsign as an example. The map is showing who and where others were able to receive my “FT” mode digital transmissions over the past 24 hours, even if they didn’t all call me back. Hey, look at that! That blue colored bubble in Australia shows that a 40 Meter signal from my attic dipole made it all the way to there about an hour and a half ago. Didn’t know an attic dipole could reach that far on 40. Guess it can! Not bad! Perhaps after seeing this, you’ll want to give PSKREPORTER a try for yourself?
By Jim Wright, N2GXJ
Perhaps as a follow-up to the recent earthquakes in California, I stumbled across this thought-provoking post on the Facebook page : www.facebook.com/groups/FT8.Digital.Mode
Tim Goeppinger : I'm not making a joke. You can use FT8 as a way to let your relatives back East that you are OK. If you CQ on an HF band, your family can find you on PSKREPORTER.
Very interesting. Even if his relatives were not hams, or even if they were and their radio was not on at the time, or if it was on, but propagation did not favor his relatives being able to respond with a confirmation (a QSL) at the time, there likely would still be a record of him having transmitted at a particular time. This is because of the vast network of WSJT-X users out there today that have their software configured to automatically report whatever signals they can decode as reception reports sent to be logged at PSKREPORTER.
Those reception report records are easily publically visible to anyone using the map display, filtered by the caller’s callsign, for up to 24 hours at : www.pskreporter.info.
See the PSKREPORTER map display example below, using my “n2gxj” callsign as an example. The map is showing who and where others were able to receive my “FT” mode digital transmissions over the past 24 hours, even if they didn’t all call me back. Hey, look at that! That blue colored bubble in Australia shows that a 40 Meter signal from my attic dipole made it all the way to there about an hour and a half ago. Didn’t know an attic dipole could reach that far on 40. Guess it can! Not bad! Perhaps after seeing this, you’ll want to give PSKREPORTER a try for yourself?
FLDIGI TIPS for Windows - Updated October, 2019
By Karl Frank, [email protected]
1. Browse to W1HKJ.COM and download FLDIGI SETUP (current version is 4.1.08).
2. Run the Installer (setup.exe). By default, FLDIGI.exe will be installed in the directory C:\Program Files (x86). This also will install FLARQ.
3. Fill in the requested information, e.g. Operator Name, Call, QTH. Don’t worry too much about these details, you can always go back later using the CONFIGURE tab.
Basic Configuration
Under the CONFIGURE tab select :
4. Modems : Select MT63 tab :
· Check 8-bit extended characters (UTF-8)
· Check Long Receive Integration
· Check both Transmit Upper and Lower start tones
· Add a few seconds tone duration (e.g. 3 seconds)
· Check Centered at 1500 Hz
· Save these changes, then close.
5. Rig Control : No need to enter anything if you are using audio-derived VOX to key the radio (e.g. SignaLink) or if you are keying a microphone manually. If you use serial port PTT (e.g. RIGblaster) then check the Use separate serial port PTT box and select the appropriate com port# in Device Box. If you use CAT to control your radio, then you will need to download FLRIG. Use and configuration of FLRIG is beyond the scope of these basic instructions.
6. Sound Card : Select Audio tab. Under Devices, select Port Audio checkbox, then select appropriate Capture and Playback devices, e.g. internal microphone and speakers OR USB sound card. Note : Some newer rigs have internal sound cards and do not require a SignaLink or RIGblaster interface. Save changes, then close.
7. ID : Under CW Postamble ID, select Transmit Callsign. Under Reed-Solomon ID (RsID), check that MT63-2000 is among the modes selected for both Receive and Transmit modes.
8. Under Pre-signal Tone, select a few seconds (e.g. 2 seconds). Save changes and Close.
9. This completes basic installation and configuration of FLDIGI. When you start FLDIGI and click on the TUNE button at the top right corner of the screen, a steady tone will be sent either thru your computer speakers or to your radio interface, depending on how you have configured this application.
10. You can learn far more from the HELP tab at the top of the FLDIGI screen and from the documentation available at W1HKJ.COM.
Next Steps
11. Download FLMSG (4.0.14) and FLWRAP (1.3.5) from W1HKJ.com. Run the installers.
12. As with FLDIGI.exe, these will end up by default in the directory C:/Program Files (x86).
Under the CONFIGURE TAB select :
MISC :
13. NBEMS Tab : Under NBEMS data file interface, check both Enable and Open Message Folder.
14. Under Reception of FLMSG file, select Open in Browser.
15. Click on Locate FLMSG box and navigate to the folder containing flmsg.exe.
16. It probably was installed in the folder C:\Program Files (x86)\flmsg-4.0.14.
17. Click to open the folder, highlight the application itself then select Open.
18. This will update the Locate FLMSG box (if that did not work, try typing in the path manually).
19. Save Changes then Close.
20. Remember, if things get badly screwed up, you can just restore defaults and start over. Or, you can uninstall FLDIGI then download and install it again as many times as you like. It is free!
Yet a few more Steps
21. For convenience, I like to pin FLDIGI to the taskbar.
22. Also, I like to have FLMSG start automatically whenever I start FLDIGI.
23. To do this, start FLDIGI and go to :
· CONFIGURE
· Other
· Autostart
24. Click in the Program 1 box, select Locate, then browse to the FLMSG folder (in C:/Program Files (x86)). Click to open the folder then click on the FLMSG-4.0.14 application itself. This should populate the Program 1 box. Check the Enable box, then Save and Close.
Amateur Extra - What does VOACAP software model?
By Jim Wright, N2GXJ
Question E3C11 in the current Amateur Extra pool, due to expire this June, asks this question, what does VOACAP software model? Did you know the answer? It is “C”, HF propagation.
So, first of all, VOACAP is FREE. That tends to get a ham’s attention! Now, what can it do for me? It can predict for you HF propagation by time and frequency between locations on the planet. What time and band is best to talk with your friend in California? Yup, VOACAP can help with that. What about predictions for upcoming DXpeditions? Yup, VOACAP can help with that.
Want to learn more? Check out : www.voacap.com.
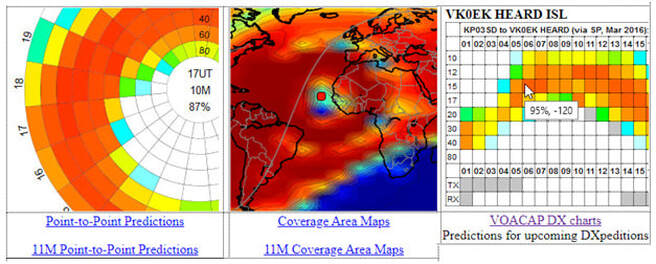
VOACAP HF propagation forecast examples
Staying In Touch Via Echolink
By Jim Wright, N2GXJ
It started with a simple request. “Jim, can you write an article on how to install EchoLink on an Android phone?”
Sure! This is something every ham stuck indoors can have fun with while we are stuck indoors. Have you tried EchoLink yet? Or maybe you are wondering why would I want to?
Why EchoLink?
Like you, I’ve seen the announcements.
“2 Meter RagChew Net, Every Thursday @ 2000 Hours, EchoLink : W2MMD-R, Please check-in on the 147.180 MHz + (131.8 Hz) Repeater”
What if I want to listen in, but don’t have my HT with me? Or what if I’m too far away, out of radio range, to hear the repeater? Or what if you are reading this and are in a similar situation, or don’t have equipment that can reach our 2 meter repeater to begin with? Does that mean you can’t join in?
This is no longer a problem. You can join in, because of that EchoLink reference!
Introducing, Echolink : http://www.echolink.org
“EchoLink® is software that allows licensed Amateur Radio stations to communicate with one another over the Internet, using streaming-audio technology. The program allows worldwide connections to be made between stations, or from computer to station, greatly enhancing Amateur Radio's communications capabilities.”
Wait. After reading that, does this mean that with EchoLink, not only might it be possible to listen in and talk over the air with hams that are using our W2MMD repeater, but maybe it is also possible to access other repeaters, throughout the USA, and the world?
Yes. That is possible.
And now you can run it as an “app” on your Android cell phone.
Ready to give it a try?
5 Steps.
1,2,3,4,5 - Here we go!
By Jim Wright, N2GXJ
It started with a simple request. “Jim, can you write an article on how to install EchoLink on an Android phone?”
Sure! This is something every ham stuck indoors can have fun with while we are stuck indoors. Have you tried EchoLink yet? Or maybe you are wondering why would I want to?
Why EchoLink?
Like you, I’ve seen the announcements.
“2 Meter RagChew Net, Every Thursday @ 2000 Hours, EchoLink : W2MMD-R, Please check-in on the 147.180 MHz + (131.8 Hz) Repeater”
What if I want to listen in, but don’t have my HT with me? Or what if I’m too far away, out of radio range, to hear the repeater? Or what if you are reading this and are in a similar situation, or don’t have equipment that can reach our 2 meter repeater to begin with? Does that mean you can’t join in?
This is no longer a problem. You can join in, because of that EchoLink reference!
Introducing, Echolink : http://www.echolink.org
“EchoLink® is software that allows licensed Amateur Radio stations to communicate with one another over the Internet, using streaming-audio technology. The program allows worldwide connections to be made between stations, or from computer to station, greatly enhancing Amateur Radio's communications capabilities.”
Wait. After reading that, does this mean that with EchoLink, not only might it be possible to listen in and talk over the air with hams that are using our W2MMD repeater, but maybe it is also possible to access other repeaters, throughout the USA, and the world?
Yes. That is possible.
And now you can run it as an “app” on your Android cell phone.
Ready to give it a try?
5 Steps.
- Install the software
- Run the software, entering your callsign and valid email address when prompted
- Validate your callsign just entered (don’t worry, I will show by example)
- Make a test connection to the EchoServer anytime, to test your setup
- Have fun!
1,2,3,4,5 - Here we go!

Step 1 : Install the software
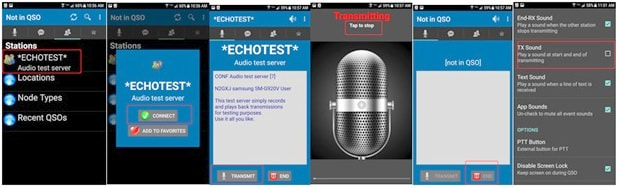
Using the pictures above as a reference, from the “Play Store” app on your cell phone, search for “Echolink for android”, then install the one with the radio tower picture from Synergenics, LLC.
Step 2 : Run the software for the first time
Open the EchoLink application just installed. The first time you run it, you will have to register your callsign and email address. The system will need to validate that it is really you doing this registration, and not someone else trying to pretend to be you, and that you are a properly licensed amateur radio operator before you can be given access to amateur radio repeaters that transmit over the air.
When you are prompted, enter your callsign to register it in the system, and your valid email address that you will be registering with the EchoLink system that will be used to confirm who you are.
Follow the directions as you go. Eventually you’ll get to a point where you can’t do much more until you validate your callsign and who you are.

Step 3 : Validate your callsign and who you are
After you have run the software for the first time, and entered your callsign and valid email address, then, you can start the validation process. To start the process, go to : http://www.echolink.org/validation
Enter your callsign where prompted in the example above, and then press continue, and continue to follow the instructions.
In the validation steps, you have to be able to provide a copy of your official amateur radio license. This step is necessary to validate that it is really you, and not someone else, trying to activate this EchoLink account as a valid radio license operator. What are your choices here?
If you have a paper copy of your official license (not a reference copy), you can use your cell phone to take a picture of it, then use that picture as the jpeg they ask for.
But what if you do not have an official copy of your FCC license? Or what if you only have a “reference copy” printed? That’s not going to work. You will need to get an official license copy from the FCC to prove that it is really you who is applying for EchoLink access. How do you do that? The instructions on the EchoLink don’t help you much here. Read on.
The FCC isn’t printing a copy of our licenses anymore when you get one issued, when you upgrade, or when you renew. So unless you already printed one to keep with your station that you can take a picture of, you’re going to have to get one. So how do you get an official copy from the FCC? Answer : Online. OK, How?
Turns out this is a very common question. So common, in fact, that someone has posted a very nice, and often referenced, step-by-step instructional video on how to get your official license copy online. With this official license downloaded as a PDF file, you can then submit a copy of that for EchoLink validation.
Here is the link to the very nice video instruction on how to get both reference copy, and the official copy (the one we want) of your license from the FCC : https://youtu.be/WaQ9HWgYNPI
Step 4 : Make a test connection to the EchoServer
Once you have completed your registration, it’s time to have some fun! We start by getting familiar with how to connect, and make calls, while testing our end-to-end RX and TX audio quality, using EchoLink’s “ECHOTEST” server.
In the application, select and connect to the ECHOTEST audio test server. If successful, it will start talking to you. Listen to the instructions.
After listening to the instructions, the “Transmit” button near the bottom of the screen will become available.
Press it, and begin talking while the Transmitting display is showing. To stop Transmitting, you have to tap the screen again. The screen will go back to the ECHOTEST display.
If you did this right, you will be back on the ECHOTEST screen, and you will be hearing your voice just transmitted to the ECHOTEST server being returned to you. Using the ECHOTEST audio test server, you can prove your phone is set up right and end-to-end functionality is working at any time.
Try it again, and again, until you get comfortable with this transmitting, then receiving sequence.
When done with your connection, use the “End” selection at the bottom of the screen. If you have disconnected from the ECHOTEST (or any repeater you connect to in the future), the screen will change to show you are not in any QSO.
Finally, let us look at adjustable settings. For example, other people on the W2MMD-R repeater will appreciate you more if you do not have beep sound transmitted at the start and end of your transmission.
Go to top of the screen where the 3 small vertical dots are, next to the search magnifying glass picture, and select “Settings”. In the “Settings”, make sure the choice to have at “TX Sound” at the start and end of your transmission is not set, as shown in the picture.
If the loudness during the playback from the ECHOTEST audio server needs adjusting, adjust the receive volume on your phone first. If that is not enough, maybe there needs to be more gain from your microphone. For advanced users only (this is normally not needed), after playback with high volume, if the voice you recorded is still too weak, there are microphone boost adjustments you can make in the setup menu. While you were recording, you might have noticed the audio bar at the bottom of the screen moving as you talked. This is indication of your voice’s loudness while transmitting. Adjust the microphone gain on the settings menu for additional gain.
When done making any settings changes, use your phone’s “back” button to go back. On my Samsung phone, this is invoked by a finger tap in an area that is on the bottom right of the front of the phone, below the normal display area.
Step 5 : Have Fun!
After practicing with the EchoServer, how about trying to connect to our W2MMD repeater, and give that a try?
If you do have an HT, or other two meter radio, you can switch it on ahead of time, and tune to our 147.180 frequency, and hear yourself over the air getting announced as being logged into our radio repeater when you connect from your EchoLink app.
Don’t forget to stop transmitting by tapping the screen when done talking.
There is a “delay” between you talking, and when your voice comes out the repeater over the air, and there is a “delay” from when the repeater is hearing a reply from over the air, and when it comes out your EchoLink application on your cell phone.
The delay may take a little getting used to, but with a little practice, you can get used to it. You might want to say the word “over” just before ending each transmission until get the hang of it.
Ok, let’s go live!
First, let’s find the W2MMD-R repeater.

On the line that says “not in QSO”, you’ll see what looks like a magnifying glass picture. Click on that picture to get a “Search” prompt to appear at the top of the screen.
Type in “w2mmd”, and then use the “go” on lower bottom of keyboard to enter it. When list is presented, select the W2MMD-R repeater in the list.
Just like with the EchoServer you practiced with, connect to the W2MMD-R repeater, which starts you in receive (RX) mode. Use the transmit button, with tap to stop, same as with the EchoServer. When done, Exit to disconnect from the W2MMD-R repeater. If you were listening on 2 meters while doing this, you’ll hear your callsign announced over-the-air after you have disconnected successfully from the W2MMD-R repeater system.
Now that you found it, you can add our W2MMD-R repeater to your favorites to make it easier to find again later.
That’s it, if you’ve gotten this far, congratulations! You can branch out on your own now, exploring other repeaters by location, or by entering partial callsigns in the search area, or by other methods of your choice, to see what you can find. You’ll find some repeaters in the system are open to everyone, and some are not. That’s OK. Go on, give it a try!
There’s an FAQ if interested, if having problems, or for more information : http://www.echolink.org/faq_android.htm
That’s it then, you are ready to go! Let’s get “on the air” with EchoLink, and have fun!
“See” you on our repeater soon!
Are You On Logbook of the World (LoTW) Yet?
By Jim Wright, N2GXJ
November 25, 2020
If you are not yet on Logbook of the World (LoTW for short), you might benefit from a few clues to get started. I recently succeeded in getting our Club’s call, W2MMD, activated in this system, and have a few tips to share.
First, you need to know where to start. Second, you’ll need to set realistic time expectations. Accept up front that this can be a week long process. Don’t expect to be able to get this running in a day because of some of the back-and-forth steps required in the process.
To get started, I suggest reading the introduction here first : https://lotw.arrl.org/lotw-help/?lang=en . As you read it, you’ll start to get an idea of some of the back-and-forth activities that will be required. Next, look on the left side of that page. Here you will find a link to the “getting started” tab. There is also a “flowchart” tab there, for those that may find it easier to visualize the steps in the process of activation more visually. Figure 1 is a copy of that flowchart.

Figure 1 : LoTW activation flowchart (reference https://lotw.arrl.org/lotw-help/getting-started-chart)
Yes, there are a bunch of steps in this process. For your own sanity, try not to ask why. My recommendation is just accept that it is what it is. Just resign yourself to following it step by step, unless you find pleasure in throwing up your hands in frustration.
Finally, when you get to the point of having an activation code delivered to your FCC-registered home address through the mail, you can enter that into a special website to get the password emailed to you that you need to log in and activate your LoTW account. It will also have a cert file that you can import into the same TQSL software on your computer you’d used to create the original request.
If all goes well, you’ll finally be able to export an ADIF file from your favorite logging program, and then select that exported file as input into the TQSL program for signing and upload to the ARRL’s LoTW servers for processing. After a few hours (the number of hours you can estimate from the queue time link http://www.arrl.org/logbook-queue-status), with some luck, your account will have been updated with QSL data you can review for your uploaded contacts.
Good Luck